Monday, August 13, 2012

Transition Day

To get the kids ready for a new school they have transition day.

Felicity is starting Middle School and Hailee is starting high school. Aubree is a Junior, but is a Freshmen mentor so she also had to go to Transition Day.  The two girls were nervous and excited about starting a new school so I took Hailee to her friend's house to get on the bus with her 3 BFFs.
Hailee & her 3 BFFs :)
On the way back I passed Aubree on the road and she was waving like crazy :) I pulled in the driveway and Felicity was walking out of the house to met her friend at the bus stop (across from our house).  I realized that I hadn't taken pictures, since it wasn't technically their first day. Then I realized that one of the girls (anonymous :) ) was wearing her sister's jacket without permission, and it did look good with the outfit...so I knew taking pictures might cause a conflict :)

I watched as Felicity waited for the bus but she and her friend were giggly and nervous so I went inside to give them their space.

Then it hit me, Aubree just drove to school, Hailee is in High School and Felicity is in Middle School!...and the tears started to roll...
They should still look like this...where did the time go?

Aubree and Hailee, at Felicity's 6th grade recognition


Felicity-6th Grade Recognition

Then I heard a bus. Felicity and her friend were screaming in excitement.  I couldn't let her see me, but I wanted to watch her get on the bus so I went out the back side of the house to see, but I was too late, so I ran to the other side of the house to see the bus go by...

Just then I saw the bus stop and the two girls getting back off the bus, laughing and basically freaking out!  They were on the wrong bus.  The Freshmen on the bus realized it was Hailee's little sister that got on instead of Hailee so they yelled at the bus driver to "Stop the Bus"!

Both girls were mortified, and I couldn't help but laugh, laughing so hard they heard me and Felicity accused me of creeping on them, lol!  

They did end up getting on the right bus but they will probably never hear the end of this.


Saturday, August 11, 2012

So today while cleaning up the breakfast mess, I looked up and saw an overripe banana that would be perfect for banana bread.  I grabbed the cookbook that I thought had the banana bread recipe but when I opened the cookbook I saw the recipe for Carmels! (There is a red line under the word, so it may be spelled incorrectly, but this is exactly how it was spelled in the cookbook). Dictionary.com states this:
caramel 
1725, from Fr. caramel "burnt sugar," ult. from M.L. cannamellis,traditionally from L. canna (see cane) + mellis "honey;" thoughsome give the M.L. word an Arabic origin.

either this is what they meant, or I'm making something completely different named after Mount Carmel 
Carmel  (ˈkɑːməl) 
 
— n
Mount Carmel  a mountain ridge in NW Israel,
extending fromthe Samarian Hills to the Mediterranean.

either way, it sounds delicious!
Sadie and Aubree, ready to help!

Here's what we need: 2 cups white Sugar
1 1/2 cups white Karo
1 stick of butter
1 can evaporated milk
1 teaspoon vanilla
1 cup of chopped nuts (we didn't have, so we didn't add)
Mix sugar, Karo, butter and 1/4 of the milk.
Cook to soft ball (235 degrees).  Since I no longer have a clip on my thermometer, this was a tricky process, we were stirring, holding the thermometer and holding the pan still.  
Meanwhile: Sadie was buttering the cookie sheet.
I'm not an expert when it comes to soft ball (...except..."Doves are #1"...Summer softball, age 5-9) , so this is what it looked like when we decided it was ready for the next step:
Keep mixture boiling while adding the remaining milk.
Remove from heat, add vanilla (and nuts if you have them)
looks very caramel-like!
Pour in a greased shallow pan.
When cool, cut in squares:
I put it in the freezer for a few hours, because it was real sticky.  It was so much easier to cut after being in the freezer! Next, wrap the squares in wax paper.
Mountain Caramel :)
They didn't get hard, like I thought they should, but I also omitted the nuts.  They taste delicious and hopefully I can master this recipe before Fall, if not I will be using it for apple dip!

Wednesday, August 8, 2012

Bread Pudding

I hadn't made Bread Pudding in several years; I thought I was the only one in the house that liked it! In fact, I loved it as a kid!  I had to have it in a certain bowl, hot from the oven, surrounded by milk (like a bread pudding island).

So last week I had a bad day :( and I need the ultimate comfort food...bread pudding...and I didn't care if I had to eat it all myself, it would be worth it.  I called my mom and got her recipe, it's not real exact but hopefully the pictures will help!

Here's what you need:
Ingredients
bread
1 cup sugar
1/2 cup brown sugar
cinnamon
1 egg
1/3 cup flour
raisins
1 teaspoon vanilla
pinch salt
milk (I used evaporated milk 1 1/2 cans)
Crumble the bread and place in a greased casserole dish stir in the remaining ingredients and cook at 350 degrees for 1 hour.
The final product...
It tasted just as good as I remembered!  I didn't take a picture of it in my bowl with milk around, I was too busy eating it!  Unfortunately, the whole family liked it so I didn't get to eat it all to myself!


Monday, July 30, 2012

T-shirt makeover

When I was in the 6th grade, jean shorts were the cool thing to have.  It felt like everyone had them but me.  I complained to my Mom but she just told me to cut off a pair of old jeans.  Since I didn't have any jeans I thought I could part with, I started bugging my sister for a pair of her old jeans.  After nearly driving her crazy, she handed me a pair of Lee jeans with a hole worn on the left butt cheek.

I took the shorts and made a heart-shaped patch from scrap material and sewed up the hole. I didn't want it to be obvious that I was covering a hole, so I cut more of the material into squares and sewed them on the shorts in a scattered-like pattern; turning the squares different ways.  I was so excited to show-off my "new" shorts! I'm sure my family was worried for me, I kind of had my own sense of fashion and it had failed me a few times before.

Not this time though...the shorts were a hit, in fact other girls were having their Moms buy them new jean shorts and new material to make their shorts cool like mine!

I think that creativity is lost when a kid (or adult) can have anything they want.

So...it's almost time for school clothes shopping and we've set a tighter budget for the girls this year.
I've definitely seen some creativity spawn from this (from them and me :) )that I'm very excited about!!!!
This is the most comfortable shirt in the world.  So comfortable, I wore it a lot, even when cleaning (nice clean bleach spot).
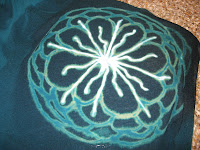
Thanks to perfecting my boredom doodling flower and a bleach pen...
I let the bleach set in until it had the color I wanted and then I rinsed it with the sprayer using cold water.
A new, wearable shirt has emerged!
Felicity, Sadie and I all had white shirts with stains which we decided to dye purple!!
1/4 cup dye, 1/4 salt and boiling water. Wear plastic gloves and stir.  I lined everything in plastic bags (because purple won't match our red kitchen :) )

First we dyed them, and then we made designs with the bleach pen.
Felicity designed this shirt on a piece of paper and then I drew it for her.  She didn't add the lines inside the heart...this was my "artistic interpretation" after dripping a line that wasn't "supposed" to be there.  I just added a bunch more lines so it looked intentional :)
After washing Felicity's shirt, it faded, so we will have to retouch the white (once we get another bleach pen).  Sadie made a "whirl pool" and a pool which consisted of squeezing a blob of bleach...um, should've bought 2 :)

Aubree is modeling Felicity's shirt because Felicity ditched us (and her project) to hang out with a friend :)

Aubree is crocheting a bottom layer to her REALLY old tank top.  There were holes in the bottom of the shirt that we cut off and she added 3 layers of crocheting to it.  I drew a quick design (another one of my boredom doodles) and she liked it.
Um...this is adorable :)

Next we took pink shirts and decided to try the ombre look using red dye.  I doodled my version of a rose with Elmer's glue (got that idea from Pinterest) and let the glue dry over night.
 The directions (I realized later said to use gel glue) but we didn't have any and I began to second guess if this would actually work...I mean it's washable glue, um really?
It worked! Shirts in bad enough shape that we would've thrown them away (wouldn't have even given them away) will now be back and cuter than ever!!

Monday, July 9, 2012

Picture this...

I've heard so many comments the last couple of years about digital cameras being so good that you don't need to go to a professional any more, well...I've read the tips on pinterest, I have a book on photography, but they just don't turn out with the same polished look...at least not when I do it. 

So a couple of days ago, I went to Portrait Innovations which was about 8 minutes away...no excuse for not getting them done earlier, right... 

They took 156 pictures, which is great, but then they have to go through them 3 at a time, keeping 1 eliminating 2.  My sis-in-law and I did this in December with just Sadie (age 2 1/2) and Cate (age 15 months) so I knew the drill and I was on a mission to make our 4 hr nightmare (but with cute pictures, so totally worth it) into the fastest time I could possibly set...I had to have a plan!

Here's the Plan:
1. I had the girls wear their fancy outfit first, and a casual outfit second, that way when we got there, they were prepared for the formal shot, and after changing into casual, they wouldn't have to focus as much on their hair...I mean...it's a casual picture :)
2. As soon as the photographer had taken all the required pictures, the girls will leave and get drinks or smoothies.  Yay, that means they don't have an opinion on which ones I pick and they don't have to listen to my "constructive" comments about pictures of them :) brilliant
(You may wonder why the constructive comments? They start out trying to sell you all the poses and that starts off at $909) My goal price was $150!
3. Make silly faces or do whatever you have to, to make sure there are plenty of pictures that don't turn out.  It just makes it easier that way.  The narrowing down process is brutal! 
Okay, so that was the plan, but now I have more tips to add.
What a cute picture of Felicity and Sadie!  Here they are sitting on a rock wall with brick behind them and...a hardwood floor?  Are they in the kitchen or the great outdoors? Lol!  I didn't notice this until I looked at them at home.  So here is the next tip:

3. Look at the background...logically.  We either needed fake grass here or a kitchen sink :)
This time we have the grass...and a brown ottoman, um okay? This is the perfect pic for a redneck joke.  You know you're a redneck when you have more furniture on the outside of the house then inside the house, lol :)
4. Clean the bottom of their shoes. I think it adds character but the girls weren't a fan.
5. No picture to show here because...if you are wearing a dress and they angle is just right (or just wrong (in this case) your panties will show... :) I won't name names, but...it happened!
6. Send the kids off for food instead of drinks/smoothies. They came back before I was done because they were hungry :( awh poor babies.  I had to send them away quick before the photographer "lured" them in...remember, they don't have an opinion, opinions take time :)
7. Make sure they have their smile down before you get there.  After complaining about a certain someone's smile (eyebrows raised, chin down, closed smile), she could have won an Academy Award with her (fake) tearful, "I just don't know how to smile!" Um, okay then don't complain when you look like a dork in the pictures...yes, she still complained :)
I ended up getting 4 poses (1-8x10, 4-5x7, 8 wallets) a packages of another pose with 40 pics, 5 greeting cards (Happy July! um, okay), a book with 19 pictures, a cd, and a poster. Tax and all, I spent $142 :) 1 hr and 20 mins...it has to be a record!


Monday, June 18, 2012

Thrift Store Chair Makeover

Aubree, Sadie and I went to one of our favorite thrift stores and we found this cute but rough chair
This chair was $2.00, so we took it home and...
pulled out our box of vintage fabric (garage sale scraps) $3.00 for the whole box and have used lots of it!  I let Sadie pick out her favorite pieces and we cut them into strips. 
She chose the two she liked the best and we tied them on, alternating colors. 
Close up
and the true test...it didn't break with her in it, it must be okay :)


Blogging tips